| Creating new regions in SimCity 4 #1103 |
| Updated: 6/17/03 |
OS/platforms(s): All |
Versions: All |
|
Contributor/author(s): Ocean Quigley - Art/Creative Director, D.B. Robinson
In SimCity 4, you can create large regions, composed of multiple cities from a greyscale image. Read on, and I'll show you how to do it.
First, decide how large a region you want. Regions are composed of lots of small, medium and large cities. A small city is a kilometer on a side, a medium city is 2 kilometers on a side and a large city is 4 kilometers on a side. I'm going to make a sample region that's 12 kilometers square, so 9 large cities can fit in it. The regions need to be in increments of whole kilometers, so no 13.56 kilometer sized regions are allowed.
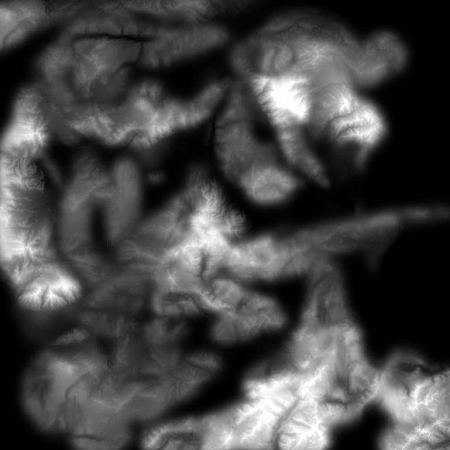
Once I've decided how large to make my region, I make a greyscale image representing the elevations of the terrain. In this scheme, white equals high elevation, black is the bottom of the sea and sea level is at around a value of 83 (on a scale of 0-255).
Here's how to figure out how large to make the greyscale image:
- Take the size of the region in kilometers, multiply it by 64, then add 1.
For my region, that's 12 * 64 + 1 = 769. My greyscale image needs to be 769 pixels square.
I go into Photoshop and make a new image that's 769 pixels square. It's useful to know where sea level will be, so I create a new temporary layer, color it blue, turn down the opacity and then double click on it in the layers dialogue box to bring up the layer properties.
I set the underlying layer opacity so that everything darker than about 83 gets covered up by blue. That way I can see where my coastlines will be.
Then I start painting away. While I'm working on it, my Photoshop file looks like this: the blue is from the second layer and tells me where my coasts will be.
When I'm done with it, I discard the blue layer and save it out the terrain map as an 8-bit greyscale .bmp or .png file. Since it looks like a bunch of islands, I call it archipelago.bmp.
You can use any paint program that will create a greyscale image. Photoshop's nice because it lets you see the water level, but it's not really necessary.
Here's what it looks like, again everything that's light will be higher elevation and everything that's black will be deeper.
The next step is deciding how the region should be chopped up into different sized cities. The way SimCity 4 does this is with a separate bitmap that defines city sizes.
The configuration bitmap should be 1 pixel across for every kilometer of region size. Since my region is 12 kilometers square, I'll make a configuration bitmap that's 12 pixels square.
Here's a (very blown up) example:
This map defines where small, medium and large cities go:
- Large cities are 4 pixels square and blue.
- Medium cities are 2 pixels square and green.
- Small cities are just 1 pixel and are red.
The way it works is that the large cities (the blue ones) needs to have blue set to 255, and red and green set to any value other than 255. The medium cities (the green ones) need to have green set to 255, and red and blue set to any value other than 255. And the small city (the red ones) need to have red set to 255, and blue and green set to any value other than 255.
Here's what the configuration map looks like actual size:
Once finished, it's saved out as a 24 bit bmp file, called config.bmp.
Now I've got two images, a greyscale terrain map and a color configuration map. I load up the game and create a new region by clicking on the new region button.
This brings up the region creation dialogue. I name the region "Archipelago" and press "Create region". It doesn't matter if it's plains or water.
This results in a new region, of the default size and layout. It also creates a new directory in my My Documents/SimCity 4/Regions folder called archipelago. I copy the config.bmp file into that directory.
Then I go back into SimCity 4, toggle over to another region, then back to archipelago, in order to get the game to use my new config.bmp.
Once that's done, I press Ctrl+Shift+Alt+R. This brings up the heightfield loading dialogue box:
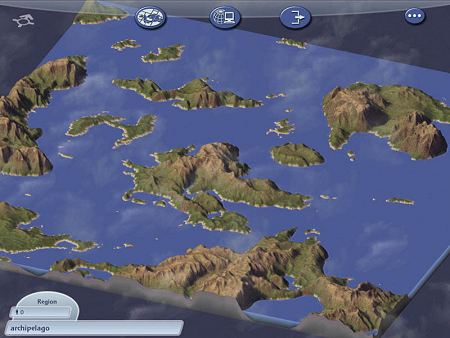
I find archipelago.bmp, select it, press OK, wait around 3 minutes (on my 1.7 GHz machine) and voila, a finished region:
Now I can zoom into any of the cities, plant trees, do some detail work and basically polish it up.
Here's a shot of the region after I've planted some trees on one of the cities:
And that's it. Now it's region that you can terraform, or build cities on or whatever!
So, just to review, here are the steps:
- Decide how large a region you want to make. (You can make them as big as you want, but once they're more than about 20-30 kilometers on a side you're going to need a really fast machine with lots of memory.)
- Create a terrain map that's 64 pixels x region size + 1 pixel.
- Save out the terrain map as a greyscale .bmp or .png file.
- Create a configuration map that's as many pixels across as your region size in kilometers. Save it out as config.bmp.
- Create a new default region in SimCity 4, name it appropriately.
- Put the config.bmp file in the resulting folder.
- Toggle between an old region, then back to your new region.
- Press Ctrl+Shift+Alt+R.
- Select your terrain map.
- Wait a few minutes (depending on how large a region you're making and how fast your computer is) and you're done. Play SimCity!
Unfortunately, SimCity 4 automatically "erodes" Grayscale *.bmp regional terrains. This makes rivers and creeks either too wide or non-existant. The terrain tools work much better in creating rivers and creeks, or at least correcting the automatic distortions. Other than that, it works very well.
 Knowledge Tree Knowledge Tree
Disclaimer: All HTML, text, and graphics in this article are copyrighted by SC4EVER.COM and/or the article's author(s). Only SC4EVER.COM has permission to reproduce the work of the author(s) unless otherwise noted. Reproduction of any text in this article without written consent of the article's author(s), or reproduction of any HTML or graphics by SC4EVER.COM without SC4EVER.COM's written consent, is strictly prohibited. Neither SC4EVER.COM, nor the author(s) of the article, are responsible for any damage caused by the use of this article.
|